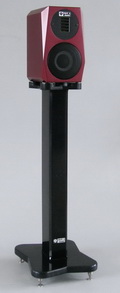
Mark & Daniel® Application Notes and Installation 1) Mark & Daniel® bookshelf speakers are heavy & slippery due to their high density CAM enclosure and high gloss finish! Therefore must be properly placed on a solid table, book shelf, or speaker stands (the stands are supplied as an optional item; please check with your local dealer for needs).
※ Avoid placement of the speakers in areas with lots of movement (e.g. children play areas).
2) M&D’s CAM enclosures are the long life products that do not fade away within years, yet preferable being keep away from direct sunlight. To maintain CAM speakers has no different as the general furniture that simply by dusting and waxing the surfaces once a while.
In order to prevent the unexpected chemical reactions to the CAM surface, it is not recommended for customers to try to remove the minor scratches with special kind of compound cleansers; only when it is necessary, then please ask for the qualified technician’s help (that experienced on maintaining the solid surfacing products) to remove the scratches and/or to refreshing the bright surfaces with proper polishing tools.
3) The nominal impedance to most of M&D speakers are normally around 3-6 Ohms, having the lower impedance and efficiency; the high current, solid state amplifier with a minimum 100Watts output per channel (rated at 8 Ohms) is therefore recommended to Mark & Daniel speakers. The vacuum-tube amplifier is also good for high quality yet not too loud music playback; however, vacuum-tube amps are normally having lower power output capability, they may not be sufficient for a high dynamic reproduction. (http://www.mark-daniel.com/index.asp?ID=10&table=faq) 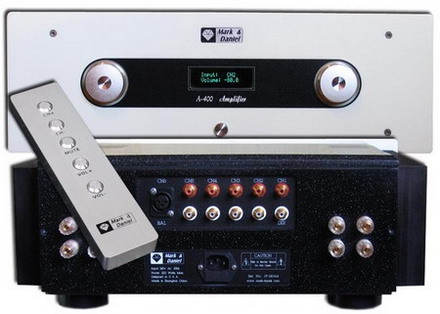
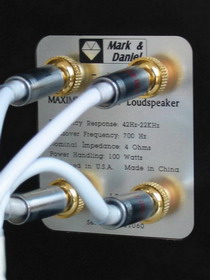
4) About Speaker Connections:
- For best sound performance and cost saving to the main (R/L) channel speakers, using two identical mid-power amplifiers configured as the bi-amp driving system to each channel is recommended by M&D.
- If driving by single stereo amplifier, then the bi-wire cable is recommended for M&D speakers (for M&D speaker models with the bi-wire binding posts).
- Good quality single-pair cable, is the minimum requirement for the center and/or surround channels.
Since we consider the bi-amp may be the best configuration for M&D speakers; here is the instructions that how to properly connecting your M&D bi-wire speakers with the bi-amp system while your pre-amp has only one RCA outout:
(http://www.mark-daniel.com/index.asp?ID=18&table=faq)
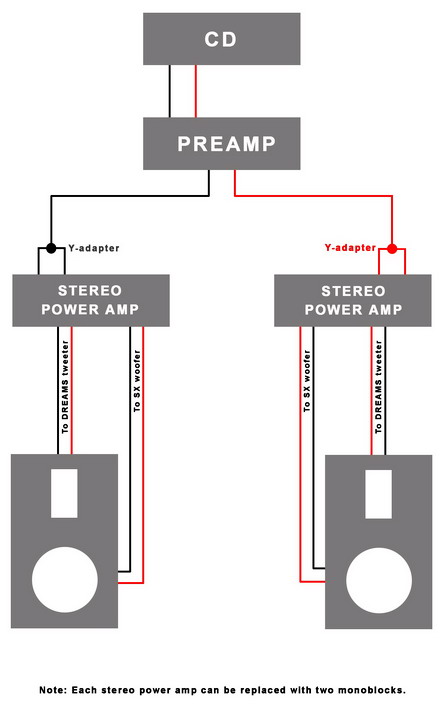
- From the preamp output, you have L signal and R signal leading out from a pair of RCA interconnect cables. Do not connect the cables to the power amps yet. Get two Y-adapters (a short interconnect cable with one female socket on one end and two male plugs on the other.) Plug L signal into the female socket of one Y-adapter. Plug R signal into the female socket of the second Y-adapter. Now you get two LEFT signals and two RIGHT signals. If you are using two stereo integrated amps (in stead of preamp and power amps), use the same method to spit the signals from your source equipment.
- Connect the two LEFT RCA signals to the L and R inputs of the first stereo amp, which becomes your L channel amp. (It does not matter what they are marked L/R channels, since they have now both accepted the same signal.) Then connect the two RIGHT RCA signals to L and R input of the second stereo amp, which now becomes your R channel amp. Same idea for the monoblocks or digital amplifiers.
- Connect the first set of speaker binding posts on your L channel amp to the HIGH Frequency speaker binding posts of your bi-wire speaker. Next connect the second set of speaker binding posts on your L channel amp to the LOW Frequency speaker binding posts of the same bi-wire speaker. You can use two pairs of speaker cable for connections; or more convenient, use the bi-wire speaker cable to each channel.
- Repeat the same with the R channel amp and the other bi-wire speaker.
5) Panel Grilles:
- For improved sound quality, we recommend removal of the veiled cover for general music listening. Our unique veiled cover panel assembly has been designed for easy installation.
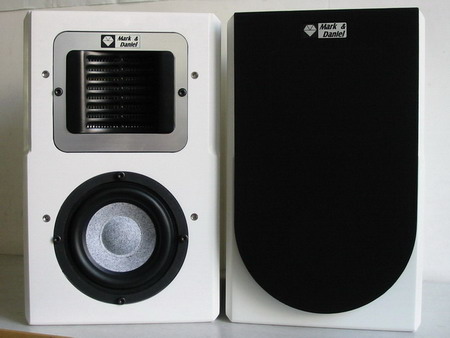
- It is a rather simple procedure to assemble the veiled cover cover. Screw the metal bits one by one into 4 holes on the M&D speaker panel. Position the veiled cover point to the bits. The veiled cover may then be attached firmly to the panel by magnetic attraction. The magnetic attachment points allow you to take off the cover at anytime. 
- M&D has also deployed the iron grilles to most of speakers for the woofers sized from 4” to 6.5”. The iron grille has a minimized influence to sound quality and is rather difficult to be removed; keeping the grille on for audition is recommended by M&D therefore. 
- By any chance if removing the iron grille is necessary. First, to turn 45 degree (either clockwise or counterclockwise) by press the grille with your hand in order to disposition the build-in magnetic attraction mechanism. Then This iron grille be pulled by a strong magnet (if it is available to you); if not, you probably need to use a suitable tool (with tweezers, forceps and so forth) to carefully pull grille’s one side up first, then remove to the complete grille.
6) M&D speakers placement:
No two listening rooms would have identical acoustic characteristics. The rule of thumb is experiment, experiment. However, from our experience, some guidelines that might help:

- Place the bookshelf speakers about same height level (based on the height of Dreams AMT driver) to your ears from where you would normally listen during audio playback. For bookshelf speakers, we recommend keeping at least 10cm (4“) spacing from the back-wall.
- In order to cut down standing-wave influence and/or frequency response irregularity, please verify that there are no integer distance relationships in between the back-wall, sidewall, and the floor to speaker’s woofer.
- One unique feature of the Mark & Daniel speakers is that they are all suitable for near-field listening, just like the monitoring speakers specially designed for recording studios. By placing the two speakers closer to you than most hi-fi speakers, the spaciousness and depth of sound stage, as well as holographic precision may be optimized.
- A quick start to placement is simply aligning the left and right speakers to form an equilateral triangle with your listening position. You might want to mark these positions before you make subsequent adjustments.
- Then, experiment with moving the triangle back and forth a few inches at a time, even expanding or contracting it in proportion to room measurement, to locate the sweet spot of your listening room.
- Placing speakers closer to the back wall in order to get stronger bass is not necessary for Mark & Daniel speakers because the woofers are designed to deliver sufficient LF response and excellent Q-control; placing speakers on the wall corner may cause the standing-wave problems to degrade sound quality.
- It is also not necessary to toe-in the speakers directly pointing to your listening position. Start with minimal or moderate toe-in angle and then fine-adjust to your satisfaction.
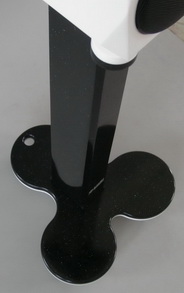
7) Do not place most of M&D floorstanders directly on the floor without installing the attached spikes onto the speaker base. The bass port(s) require at least 30mm to 50mm (1.2”-2.0”) spacing between the speaker enclosure and floor for proper operation. If your listening room has a carpet on the floor, a hard surface pad such as a large tile may be placed beneath the speaker to keep proper spacing and better stability.

8) Your new arrival M&D speakers have not been fully run-in; please play the speakers at the medium volume for few days, then gradually turn the volume to the full sound reproduction level. This process takes normally over 100 hrs for M&D bookshelf speakers; for larger (above 8" woofer) floor-standing speakers, a 200 hrs break-in may be necessary to get the satisfactory sound reproduction.
9) M&D speakers have a very high power handling capability, and they will not easily be damaged during normal playback operation, even under a short time of excessive SPL reproduction. However due to the extraordinary travel capability of our SX woofers, the piston cone can possibly exceed suspension extremes under improper operation (see item 10), causing “bottoming impact” noises or even incurable damage to the voice coil. Please prevent such situations from happening!
10) When a very low frequency signal enters the vented enclosure (for Maximus bookshelf series, probably refers to a strong signal below 30Hz), the air generated by woofer will no longer be trapped in the enclosure, thus resulting in possible damage.
This “bottoming impact” situation is most likely to happen to audiophiles who are still playing vinyl records. “Subsonic” frequencies due to improper tone-arm drop or warped records can be reproduced through the amplification system. Another example may occur when someone is trying to demonstrate the outstanding performance of M&D speakers by turning up the volume too loud during a music segment or program with strong subsonic content.
Please check the music content before encounter abnormally large SPL operation. Switch the “subsonic filter-in” to your amplifier (if any); or otherwise, properly cut down the volume to prevent possible damage.
11) Application Notes for Omni-Harmonizer:
- The CAM made cone diffusor is not fixed on the Omni-Harmonizer or onto the M&D speakers with the Omni-supertweeter, which is very easy to fall-off and/or damage by accident; please must be careful! - By pulling (or unscrew) the cone diffusor upwards, it can be easily separated from the base unit; remove the veiled cover and dusting the cover once a while to avoid sound degradation of the device.

- The best placement of the Omni-Harmonizer unit is to place the unit a little higher than the ears. Placing it on the attached speaker’s enclosure top is a common choice.
- You’ve already selected an excellent speaker to incorporate with the Omni-Harmonizer, so do not try to use this unit as an ordinary super tweeter in order to compensate high frequency response. The purpose of the Omni-Harmonizer is to improve the spatiality of very high frequencies by adding more vivid audio reflections. Depending on the attached speaker’s sensitivity and your room condition, tune the level attenuator to your satisfaction but set the sensitivity lower rather than higher, to avoid an over stressed HF response with your sound system, which can also result a lighter load to your power amplifier. 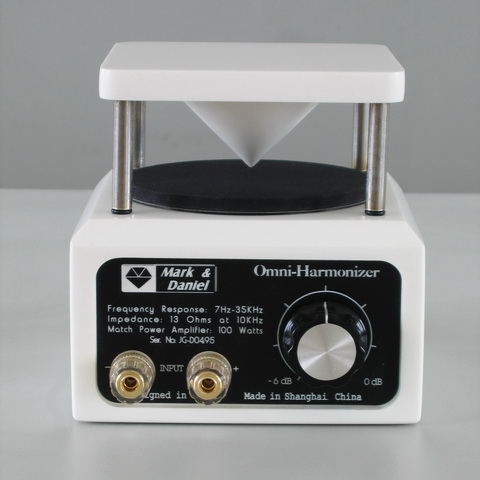
- As a basic rule, your speaker should have an output efficiency that is 0dB-4dB higher than the Omni-Harmonizer‘s sensitivity. The final setting must be determined by listening. It is quite dependent upon your listening room conditions (how large the listening room is, and/or how “active” the listening room is, etc.) and the speaker’s characteristics (what kind of tweeter is used and its natural dispersion characteristics).
- Do not judge the sensitivity setting when standing near the speaker system; what you will hear from the Omni-Harmonizer is only a small part of its acoustic output since it has a 360 degree radiation pattern to completely fill the room. You should decide on the best setting by auditioning from the chair where you normally listen to music. Most people tend to choose a sensitivity setting higher than what they actually need for balance in the very beginning, based on our experiences.
[HOME]
|